如何理解GridView-創新互聯
本篇內容主要講解“如何理解GridView”,感興趣的朋友不妨來看看。本文介紹的方法操作簡單快捷,實用性強。下面就讓小編來帶大家學習“如何理解GridView”吧!
讓客戶滿意是我們工作的目標,不斷超越客戶的期望值來自于我們對這個行業的熱愛。我們立志把好的技術通過有效、簡單的方式提供給客戶,將通過不懈努力成為客戶在信息化領域值得信任、有價值的長期合作伙伴,公司提供的服務項目有:申請域名、虛擬主機、營銷軟件、網站建設、晉源網站維護、網站推廣。(一)DataKeyName屬性
(1)DataKeyNames一般都是用來對當前行做標示的,所以一般為數據庫的ID。
(2)GridView.DataKeys[e.RowIndex],e.RowIndex是獲取事件對應的行,GridView.DataKeys[e.RowIndex]就是獲取對應行的標示也就是DataKeyNames所指定列的值。
(3)DataList和Repeater是沒有的該屬性的。
在代碼中這樣使用:(定義的該函數在下面都需要調用)
/// <summary>
/// 實現數據綁定功能
/// </summary>
private void BindToDataGird()
{
 SqlConnection con = DB.CreateCon();
 SqlDataAdapter sda = new SqlDataAdapter();
 sda.SelectCommand = new SqlCommand("select employeeID,FirstName,LastName,Title,BirthDate from employees ", con);
 DataSet ds = new DataSet();
 sda.Fill(ds, "emp");   //將查詢到的數據添加到DataSet中。
 this.GridView1.DataKeyNames =new string[]{ "employeeID"}; //DataKeyNames的使用
 this.GridView1.DataSource = ds.Tables["emp"];
 this.DataBind();
}
如何取值?
DataKey key = GridView1.DataKeys[e.RowIndex];//其中e為GridViewDelete(或者Edit)EventArgs e
string empID = key[0].ToString();
(二)分頁
由于GridView中封裝了分頁的功能。這里實現起來很容易。先需要設置屬性:AllowPaging/PageSize/PageSetting。然后編寫事件代碼:
protected void GridView1_PageIndexChanging(object sender, GridViewPageEventArgs e)
{
 this.GridView1.PageIndex = e.NewPageIndex;
 this.BindToDataGird();
}
(三)排序
首先設置AllowSorting屬性為true.事件代碼:
protected void GridView1_Sorting(object sender, GridViewSortEventArgs e)
{
 if (ViewState["order"] == null)  //使用ViewState設置雙向排序。
 {
  ViewState["order"] = "ASC";
 }
 else
 {
  if (ViewState["order"].ToString() == "ASC")
  {
   ViewState["order"] = "DESC";
  }
  else
  {
   ViewState["order"] = "ASC";
  }
 }
 //數據綁定顯示
 SqlConnection con = DB.CreateCon();
 SqlDataAdapter sda = new SqlDataAdapter();
 sda.SelectCommand = new SqlCommand("select employeeID,FirstName,LastName,Title,BirthDate from employees ", con);
 DataSet ds = new DataSet();
 sda.Fill(ds, "emp");
 ds.Tables["emp"].DefaultView.Sort = e.SortExpression + " " + ViewState["order"].ToString(); //設置排序
 this.GridView1.DataSource = ds.Tables["emp"].DefaultView; //將表的默認視圖作為數據源。
 this.DataBind();
}
(四)刪除
這里需要注意一點:就是獲取某一行的主鍵值。
protected void GridView1_RowDeleting(object sender, GridViewDeleteEventArgs e)
{
 DataKey key = GridView1.DataKeys[e.RowIndex];
 string empID = key[0].ToString();
 SqlConnection con = DB.CreateCon();
 SqlCommand cmd = new SqlCommand("delete from employees where employeeID= '"+empID+"'" , con);
 con.Open();
 cmd.ExecuteNonQuery();
 this.BindToDataGird();
}
(五)編輯(更新和取消)
protected void GridView1_RowEditing(object sender, GridViewEditEventArgs e)
{
this.GridView1.EditIndex = e.NewEditIndex;
this.BindToDataGird();
}
protected void GridView1_RowCancelingEdit(object sender, GridViewCancelEditEventArgs e)
{
this.GridView1.EditIndex = -1; //設置索引值為負取消編輯。
this.BindToDataGird();
}
protected void GridView1_RowUpdating(object sender, GridViewUpdateEventArgs e)
{
DataKey key = GridView1.DataKeys[e.RowIndex];
string empID = key[0].ToString();
string lastName=((TextBox)(GridView1.Rows [e.RowIndex ] .Cells [2].Controls [0])).Text ; //將GridView中某列中控件強制轉換為TextBox,然后取出它的值。
Response.Write(empID +"&" + lastName ); //用于測試。
this.GridView1.EditIndex = -1;
this.BindToDataGird();
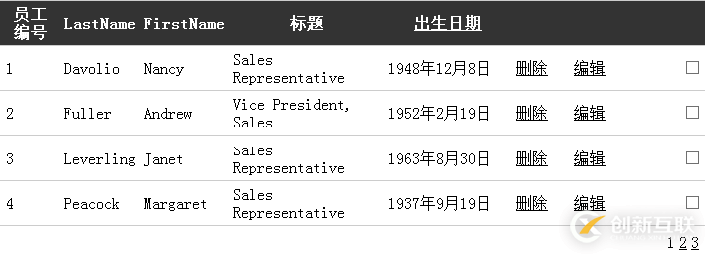
}附結果圖:
到此,相信大家對“如何理解GridView”有了更深的了解,不妨來實際操作一番吧!這里是創新互聯建站,更多相關內容可以進入相關頻道進行查詢,關注我們,繼續學習!
文章標題:如何理解GridView-創新互聯
網站網址:http://www.js-pz168.com/article10/csgddo.html
成都網站建設公司_創新互聯,為您提供靜態網站、移動網站建設、網站改版、自適應網站、品牌網站建設、商城網站
聲明:本網站發布的內容(圖片、視頻和文字)以用戶投稿、用戶轉載內容為主,如果涉及侵權請盡快告知,我們將會在第一時間刪除。文章觀點不代表本網站立場,如需處理請聯系客服。電話:028-86922220;郵箱:631063699@qq.com。內容未經允許不得轉載,或轉載時需注明來源: 創新互聯

- 旅游APP開發的好處和功能 2021-04-26
- 做個APP開發需要多少錢呢? 2020-11-19
- 天津app開發外包公司現狀大解密 2023-03-05
- 上海APP開發哪個企業好? 2020-11-30
- 太原二手交易APP開發都需要些什么? 2020-12-30
- 英語APP開發,滿足用戶學習需求 2022-05-29
- 客戶找網絡公司做APP開發,是什么因素決定了APP開發費用的? 2022-06-19
- 景德鎮APP開發要分哪幾個步驟? 2020-12-13
- 上海智能灌溉APP開發對用戶有哪些價值 2020-12-29
- APP開發價格(費用)和哪些細節有關? 2020-11-22
- 普陀APP開發行業的現狀與問題 2020-11-16
- 雨山APP開發公司哪家好? 2020-12-10